
The team screen invites you to choose a trio from 24 familiar creatures. A strong trio is not simply three favorites or three high-stat cards. It is a set of answers to situations that appear in an arena: a safe opening, a response to a bad matchup, and a way to finish a close round. This guide explains how to make those decisions without pretending there is one universally correct lineup. The source game can change its balance, and the best choice also depends on your hands, screen, arena, and opponent.
The roster below is the roster shown on the source game's page at the time this guide was checked. Individual profiles are practice suggestions, not claims that a particular hidden ability, exact move list, or damage value is present. Open each character card in the game to inspect the current moves and attributes before making a final selection. Treat the profiles as questions to test in Quick Battle.
Decide what your team needs
Begin with the job you want each slot to perform. An opener is the creature you can control under pressure. It should help you learn spacing, move range, and the opponent's habits while keeping enough health to make a later switch useful. A stabilizer is the teammate you choose when the opening matchup turns uncomfortable. It does not have to win instantly; it has to slow a losing pattern, reach safer ground, and buy a chance to rebuild your position. A closer is a creature whose attacks and movement you can execute reliably when the clock or remaining health creates pressure.
Those jobs are flexible. A creature may be your opener in one arena and your closer in another. You are building a plan, not assigning permanent titles. If an arena rewards control of an exposed zone, your opener may need the safest route to that zone. If the CPU is aggressively chasing, a creature with comfortable counterattack timing can stabilize even when it was chosen as an attacker. Write the jobs beside your three names before a match and revise them after a few rounds. The revision should come from what happened on screen.
Coverage is the second question. The game uses types, but type labels alone do not describe how a fight plays. Range, direction, terrain, ability rules, and the player's timing all matter. Choose at least one teammate that asks the opponent a different question from your first pick. If your opener wins only when it can approach, consider a teammate that can operate at a safer distance. If your first pick depends on a narrow projectile lane, add somebody comfortable moving around cover. If two picks both struggle to escape a corner, the third pick should help break that pattern. This is functional coverage: a different way to play the next exchange.
Finally, keep execution realistic. A theoretically perfect counter is of little value if you cannot aim its moves while moving or remember its preferred range. In a first session, a balanced trio you understand beats an intricate lineup you cannot operate. You can add technical choices after you have a baseline. For a useful starting exercise, play the same trio on Easy CPU in two arenas, then change only one creature. If results improve, ask whether the new pick solved a repeatable problem rather than assuming its name or type made the difference.
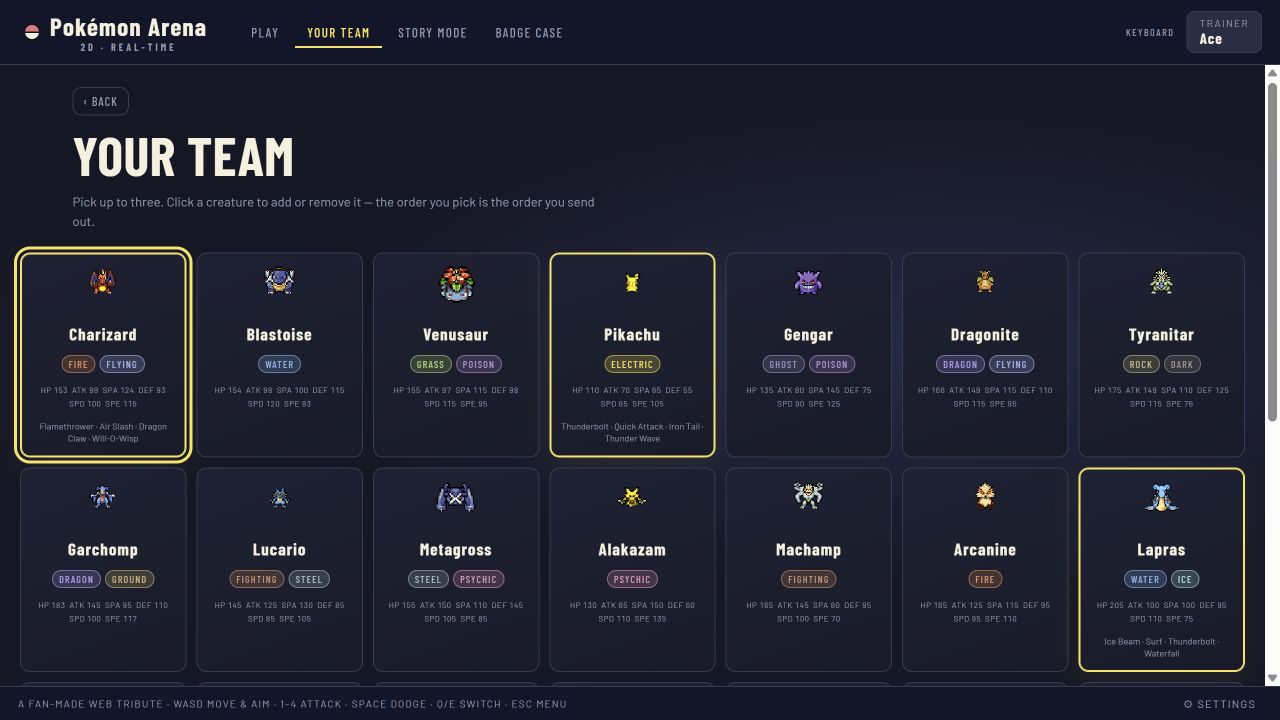
Read the selection screen instead of guessing
The team selection screen presents character information, including types and visible stats. Spend a moment there. Look at the current move descriptions and the controls for selecting and placing a team member. Compare the range or function of available moves where the interface explains them. The website's roster can be an overview, but the live game screen is the best place to check a detail that may change after an update.
When you do not know a creature, avoid judging the entire card from one conspicuous stat. A fast option may be hard for you to aim. A durable option may help you survive long enough to learn. An attack with appealing damage may be awkward behind arena cover. Choose one thing to investigate: Can I maintain an angle for this move? Can I disengage after using it? Does the move consume a resource that I often waste? The answer comes from a trial round, not from a tier label.
Make a tiny comparison log. Record the creature, arena, CPU setting, and one reliable action you discovered. For instance, note that you could safely wait behind a particular obstacle, or that a short dodge placed you within your comfortable attack range. Do not record invented frame numbers or damage percentages. A qualitative log is enough to separate a real improvement from the feeling of novelty. If you revisit the same creature next week, the log also gives you a concrete drill to repeat.
The roster: familiar names, practical experiments
Charizard
Charizard is a useful first test if you want to practice attacking while managing exposure. The battle screenshot on this site shows Charizard in Viridian Grove, and a separate screenshot shows a Flamethrower exchange. Start by checking the current move card, then test how far you can stand from an opponent while keeping a clear lane. Notice whether you tend to press an attack from behind cover, where the visual effect looks active but the geometry is poor. Build a habit of stepping into an angle, attacking once, and leaving before you become stationary. For team construction, pair Charizard with a teammate you are comfortable using when the opponent closes the distance and with another that can contest a route Charizard cannot hold safely. The goal is to give yourself a switch decision, not to rely on one dramatic move.
Blastoise
Use Blastoise as an exercise in patience and lane control. Before the round, identify a central path and a side path. Try to make the opponent cross a space you can see clearly, then test the attacks available on the current card. If a shot misses, ask whether your facing, distance, or the opponent's cover caused the miss. Those are different mistakes and need different corrections. In a trio, Blastoise can be a candidate for a stabilizing role if its controls feel comfortable to you. Practice switching to it before your first creature is trapped at very low health; a rescue switch made too late often leaves no time to establish position. Its presence in Misty's story lineup makes it especially useful to study as both a pick and an opponent.
Venusaur
Venusaur offers a way to practice holding a favorable area without chasing every movement. In the first round, pick a piece of cover and work on returning to it after each exchange. Read the live move descriptions for any area, range, or recovery constraints rather than inferring behavior from the character's appearance. A team containing Venusaur should still have an answer when the opponent refuses to enter your preferred zone. Use your other picks to change the angle of attack or escape a crowded lane. Erika's lineup includes Venusaur, so observing that story match can also help you recognize the difference between fighting near a useful position and wandering into one because you are focused on the opponent's health bar.
Pikachu
Pikachu can teach purposeful movement. Pick one safe route between cover pieces and repeat it until you can move, face, and attack without losing track of the opponent. Fast input alone is not a strategy: if you run across the open center while a move is unavailable, you may give up the advantage that movement created. The live game screenshot of a mid-battle switch shows Pikachu entering after another teammate, a reminder that the switch itself needs an exit plan. Try Pikachu as a closer only after you can reliably stay oriented in a low-health exchange. Lt. Surge's lineup includes Pikachu; that makes the story fight a useful place to watch how a moving opponent changes your aim.
Gengar
Gengar is a good pick for rehearsing deceptive angles and safe retreats, provided you first inspect its actual in-game moves. Instead of pressing every available action, approach from one side of cover, threaten an attack, and move back to a different lane. Watch whether the CPU follows or holds position. That response tells you where your next attack might be safest. A trio with Gengar benefits from a second pick you can use when you need to stand your ground and contest a zone. In the story route, Koga uses Gengar alongside Scizor and Umbreon. Do not assume you can solve that fight by memorizing a single type answer; practice seeing which member is active and which lane it is controlling.
Dragonite
Dragonite can be a candidate for players who want a flexible middle slot, but test its present move set before deciding what that flexibility means. In one trial, limit yourself to two moves and learn their comfortable distances. In a second trial, add the remaining moves only when you can explain why you are using them. This keeps a versatile card from becoming a string of unplanned button presses. Pair Dragonite with an opener whose weaknesses you have observed directly and a closer whose timing feels simpler under pressure. When a match goes badly, your test is whether Dragonite creates a new playable position. If it only repeats the same losing approach at a different speed, the slot is not solving your team's problem.
Tyranitar
Use Tyranitar to study deliberate entries. Pick a route into the fight and identify the nearest cover or exit before you commit. If the opponent keeps landing attacks as you move in, change the route rather than hoping that higher health will cover the error. The Brock story challenge includes Tyranitar, which provides a chance to observe how the CPU uses space with it. As a team member, Tyranitar may feel like a reassuring choice when you want to withstand a messy exchange. That feeling is useful only if you still take controlled turns: wait, threaten, act, and reset. Build your trio so another member can handle an opponent who repeatedly stays outside your comfortable distance.
Garchomp
Garchomp is a strong practice subject for approach timing. Run one round in which you never enter until the opponent has shown an attack or crossed a line you chose in advance. The aim is to replace impulsive pursuit with a visible trigger. Check the live card for the exact tools that make an approach possible; do not assume a move behaves like it does in another game. Garchomp appears in both Brock's and Giovanni's listed story teams. That gives you two contexts in which to study it as an opponent, perhaps with different teammates and positioning. If you select it, pair it with at least one creature you can use when the opponent denies a direct route and forces a longer exchange.
Lucario
Lucario invites a balanced practice routine: one minute of moving without attacking, one minute of carefully aimed single attacks, and one minute combining both. This reveals whether your errors happen before the attack or during its recovery. Read the current move names and costs in the game; character identity alone cannot tell you the optimal sequence. A team that includes Lucario should not depend on it to solve every matchup. Give it a clear job such as opening to gather information or closing after another teammate has created space. If you switch into Lucario with no plan for the next two seconds, the opponent may preserve the same positional advantage it already had.
Metagross
Metagross is a useful reminder that a visible stat advantage does not automatically overcome poor geometry. Compare how your current attacks perform in an open lane and beside an obstacle. If the opponent can circle you, stop chasing its sprite directly and move toward the next useful space instead. This turns the fight into a position problem that you can observe and repeat. Lt. Surge's story lineup includes Metagross, so there is a chance to practice the matchup without inventing hidden behavior. As a teammate, choose Metagross for a job you can describe, such as anchoring a zone or absorbing a difficult transition. Support it with a creature that can quickly change the angle of a fight when that position becomes unfavorable.
Alakazam
Alakazam can help you train precise spacing. Before pressing a move, pause long enough to verify your facing and whether an obstacle crosses the line to the target. After the move, decide whether you should stay or travel to a safer square. The point is to make the interval after an attack an active decision rather than a dead stop. Sabrina's team includes Alakazam and Espeon, so that story challenge can test whether you track more than one opponent pattern. For your own lineup, pair Alakazam with a teammate whose plan still works when you cannot maintain clean separation. This is a functional safeguard, regardless of which type icons appear on the cards.
Machamp
Machamp makes a clear rehearsal for close-range discipline. Choose a starting location with two exit directions. Let the opponent approach or spend a move, then test an entry and immediately plan your retreat. If you repeatedly attack while too far away, the lesson is not to press the same button faster; the lesson is to measure range with movement. The current in-game card is the authority for what Machamp can do in this version. On a team, it can fill a pressure role if you can enter without taking a free hit. Pair that role with another member able to challenge an opponent that stays away or hides behind cover. The strongest team often wins because it can change its question, not because every member asks it louder.
Arcanine
Arcanine is a useful option for learning how to create and spend momentum. Test a sequence in which you move into a favorable angle, use one move, and then reset rather than continuing forward automatically. Track the moment when your approach becomes overextension. Blaine's story lineup includes Arcanine, Charizard, and Blaziken, so you may meet a cluster of pressure styles in one challenge. In your team, Arcanine should have a planned handoff: if the opponent survives your initial pressure and positions near a favorable obstacle, which teammate can change that geometry? A clear switch rule is more valuable than a vague promise to keep attacking until something happens.
Lapras
Lapras is worth trying when you want to practice slow, readable exchanges. Pick a stable position, check the current attack ranges, and let the opponent's movement tell you when to act. Avoid assuming that being harder to dislodge means you can ignore an exposed recovery window. Every move still has a context. Misty's story team includes Lapras and Blastoise, which makes the challenge a useful place to practice against two names that may ask you to respect lanes. In a trio, Lapras may stabilize a fight if its pace suits you, but it needs partners that can handle rapid changes of direction. Test the trio in an arena with cover and another with longer sightlines before deciding that the balance works.
Snorlax
Snorlax can teach you to value position over the sensation of durability. Before a round, mark a zone you want to defend and one route that lets you leave it. If you spend the entire match advancing without a reason, you may turn a forgiving character into a stationary target. Watch the actual game card for movement and move information; the name does not justify claims about exact armor or damage. Try Snorlax as an opener when you are learning the HUD, or as a stabilizer when your first pick needs a calmer transition. Assess it by asking whether your team gains time and ground. A large health bar by itself does not mean the team is making progress toward a win.
Scizor
Scizor is a useful test of short, deliberate commitments. Begin outside the opponent's comfortable range and choose a moment to enter that you can explain afterward. If the attempt fails, determine whether the timing, route, or move choice was at fault. Do not rewrite the whole team based on one exchange. Koga's story lineup includes Scizor; watching it alongside Gengar and Umbreon can help you practice identifying which opponent currently demands the most attention. In your own trio, give Scizor an alternative path when the first approach is blocked. That may be a teammate with a different range, a different type, or simply a move pattern you can execute more safely on the current map.
Umbreon
Umbreon is a helpful exercise in patience and defensive decision making. Try a round where your goal is to avoid unnecessary dodges and switches. Move to reduce exposure, wait for a clear exchange, and record when you actually needed an emergency option. You may find that good positioning saves more resources than repeated reactions. In Koga's lineup, Umbreon is one of three creatures to recognize. When selecting it yourself, ask what offensive path your full trio has if the opponent refuses to chase. A defensive pick should give your team a dependable floor, not leave it with no way to contest a reward area or close a round.
Espeon
Espeon can be used to refine aim, especially in arenas where obstacles create short sightlines. Inspect the current move descriptions, then test one attack from a stationary angle and again while moving laterally. Notice which version you can reproduce. The repeatable version should become your baseline before you attempt a more elaborate sequence. Sabrina's story team pairs Espeon with Alakazam. Studying that challenge can highlight the importance of tracking an active creature and leaving a risky lane early. In your own team, combine Espeon with somebody comfortable contesting the space that Espeon gives up while seeking a clean angle. Good coverage can be geographic as well as elemental.
Togekiss
Togekiss offers a practice question: can you keep a favorable distance without retreating all the way to an arena boundary? Choose a cover piece as a reference, move around it, and attack only from positions where you understand your exit. If your back reaches a wall, you have lost some of the space that made your plan work. The live card tells you which moves support this approach in the current build. In a team, Togekiss may suit a player who wants a calmer rhythm between high-pressure picks. Test whether it genuinely breaks your opponents' common patterns. If every teammate ends up using the same narrow lane, the roster labels are varied but the team's actual options are not.
Hydreigon
Hydreigon is a candidate for players who enjoy controlling a larger area, subject to the moves shown in the current game. Start with a simple two-lane plan: threaten one lane, then reposition to the other when the opponent adapts. Do not spend all your resources proving that one move can land. Giovanni's listed team includes Hydreigon, Garchomp, and Swampert, so the story encounter can expose you to a lineup with several recognizable threats. For your own trio, Hydreigon needs a switch plan when the opponent gets past the space you intended to control. A teammate that can escape or fight at a different distance will make the whole composition less brittle.
Salamence
Salamence is useful for a controlled aggression drill. Identify the range where you feel comfortable, enter only after a visible cue, and stop the sequence as soon as you lose the angle. That stop is part of the skill. Many players recognize when an opening starts but continue attacking after it has ended. Check the current move card rather than borrowing expectations from other Pokémon titles. As a team member, Salamence can share a pressure role with another pick, but two aggressive slots need a reliable stabilizer. If every teammate requires a risky entry, a bad first exchange may force you to repeat the same losing decision three times.
Sceptile
Sceptile can make movement drills feel immediate. Trace a triangle between three safe points and practice facing the opponent at each corner. Then add one attack per lap and see whether the extra input breaks your route. Erika's story team includes Sceptile alongside Venusaur, offering a chance to practice against a lineup that may make you think about both chasing and holding space. In your own trio, use Sceptile for a role you can name after testing the current moves. If it helps you approach but cannot comfortably stay in the exchange, plan a teammate who can hold the space you reached. That is a more useful team relationship than simply choosing three different type icons.
Blaziken
Blaziken is a good way to practice commitment limits. Make a rule that one successful attack does not automatically authorize a second. After the first, read distance, resources, and the opponent's response. If all three still favor you, continue; otherwise reset. This prevents momentum from becoming tunnel vision. Blaine's story lineup includes Blaziken with Arcanine and Charizard, giving you a setting to observe how consecutive threats can compress your decisions. In a lineup of your own, pair Blaziken with a member that can maintain a longer exchange when the opponent denies a quick opening. Choose a third pick based on the arena or matchup you repeatedly struggle with, not on the excitement of another aggressive name.
Swampert
Swampert appears in a live battle screenshot opposite Charizard and in Giovanni's listed team. Use those references to test positioning, not to infer a guaranteed matchup outcome. In a trial round, observe how your selected moves interact with cover, and note how easily you can move from defense into a counterattack. If a particular route repeatedly exposes you, make your next attempt from another side rather than repeating the same line. As a team member, Swampert may offer a different pace from a more mobile opener, but that is a practice hypothesis to verify in the current build. Give the trio a clear answer to long-range pressure and another to close pressure, even if those answers involve switching at different moments.
Three starter compositions to test
The learning trio: Charizard, Blastoise, Venusaur. This familiar set gives you three clearly different names and encourages you to inspect different cards. Use Charizard to learn attack lanes, Blastoise to test a steadier response, and Venusaur to practice defending an area. These are training assignments, not a claim that the trio is optimal. Run three Quick Battles in the same arena and change the lead each time. Notice which lead gives you the clearest view of your own mistakes. Keep the order that makes decisions easier, then test it on a second map.
The movement trio: Pikachu, Sceptile, Snorlax. Use Pikachu and Sceptile to learn two different rhythms of movement, then use Snorlax to practice slowing down. The exercise asks whether you can deliberately change pace when the fight calls for it. If you find that your first two picks both overextend, do not blame the third for failing to repair every bad entry. Instead, choose one route and one retreat point before each attempt. If the current move cards make the assignments feel unsuitable, swap a member and preserve the training goal.
The matchup lab: Garchomp, Alakazam, Lapras. Treat each member as a question about the opponent's preferred distance. Open with one, switch when the opponent repeatedly wins the same type of exchange, and see whether the new pick genuinely changes that exchange. This composition is a thought experiment, not an elemental guarantee. After each match, write which switch changed the geography of the fight and which merely changed the character portrait. That one sentence will teach more than repeating the lineup until it wins by accident.
When and why to change a teammate
Do not rebuild a team after every loss. Keep the trio for at least a few controlled attempts so that you can separate a bad composition from poor execution. A useful test holds the arena and CPU setting constant while changing one teammate. If the old team loses because you cannot cross an open lane, choose a replacement with a plan for that lane. If it loses because you panic after a missed attack, a new roster may not fix the real issue. Practice recovery first.
Change a teammate when you can state the unmet need in plain language: “I need a safer way to contest the middle,” “I need somebody I can aim while retreating,” or “I need a closer whose first action I can perform under pressure.” Those sentences point to a test. “I need a better Pokémon” does not. Keep an eye on patches to the source game. Move availability or balance may shift, and your best lineup can change with it. The method of identifying a job, testing a hypothesis, and reviewing the result remains useful even then.